Let’s make a froggy hat
Four different types of stitches make it easier to follow along to create fun DIY hat
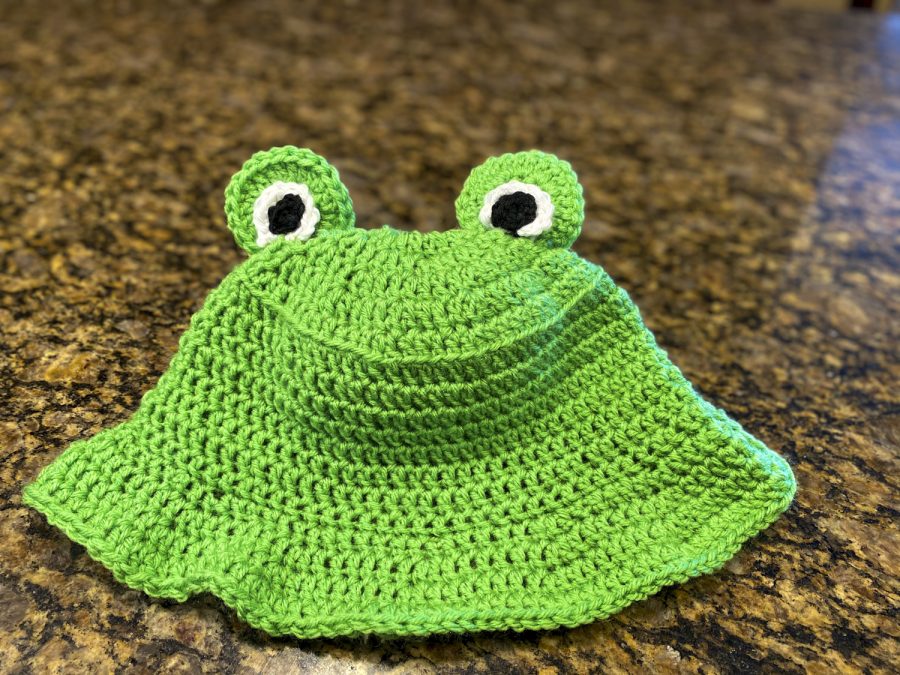
Completed froggy hat following the steps; took columnist about three hours to make.
March 4, 2021
One of my favorite hobbies that I picked up during quarantine was crocheting. Something fun that I learned to make was a frog hat, and that’s what I’m about to share with you today. This takes some time but it’s something fun to do when you don’t have anything else. You’ll need green, white and black yarn. I used secondhand yarn so the exact size isn’t known, however, you should use a 5.5 mm crochet hook for the green and white yarn, and a 4.0 mm crochet hook for the black yarn.
This crochet project is straightforward; however, if you need more explanation of what stitches are, there are a plethora of YouTube videos that can dive deeper and show you hands-on help. Something I, unfortunately, cannot do in an article.
This project uses magic circles, chains, double crochets, and slip stitches only, so no need to worry about knowing how to do anything else! I won’t be using abbreviations so just follow these instructions and you’ll have your froggy hat in no time!
(The websites linked are not mine. They are ones that I used to help me when I began learning to crochet.)
Supplies:
Green yarn
White yarn
Black yarn
5.5 mm Crochet hook
4.0 mm Crochet hook
Scissors
Making the Hat!
Step 1: With green yarn, start by making a magic circle and chain 2 at the end.
Step 2: Double crochet 11 over the circle and the end string, to make a full 12 crochets counting the 2 chains at the beginning (Row 1).
Step 3: Pull the string tight to close the circle and slip stitch to connect the circle to the first stitch.
Step 4: Chain 2.
Step 5: Crochet 2 double crochets in each stitch. Do this all the way around the circle and connect the ends with a slip stitch (Row 2).
Step 6: Chain 2.
Step 7: Crochet 2 double crochets in the first stitch, and 1 double crochet in the following second stitch (Row 3).
Step 8: Repeat the pattern all the way around the circle and slip stitch to connect Chain 2.
Step 9: Repeat steps 7 and 8, increasing the following stitch until it reaches 4 double crochets, one in each stitch (Row 4, 5 and 6).
Step 10: Crochet 1 double crochet in each stitch. Make sure you place this round in the back string of each stitch. Connect the round with a slip stitch (row 7).
Step 11: Chain 2.
Step 12: Crochet 1 double crochet in each stitch for 7 more rounds or until the hat fits the head length you want. These rows will all be the same length, creating the body of the hat (Row 8, 9, 10, 11, 12, 13 and 14).
Step 13: Repeat steps 7 and 8, with the following stitch starting at 5 double crochets, one in each stitch. Make sure this round is on the front string of each stitch to help the hat brim start to form (Row 15).
Step 14: Repeat steps 7 and 8, increasing the following stitch by one from the previous round until there are 8 double crochets. This round should have 6 double crochets, one in each stitch following the 2 double crochets in the first stitch (Row 16, 17 and 18).
Step 15: Cut yarn with a few inches of extra length and pull the string through the crochet loop and pull tight. Weave the remaining yarn through the end of the hat until it’s gone.
Making the eyes!
Step 16: With green yarn, make a magic circle with 12 double crochets, connecting the ends with a slip stitch and chain 2.
Step 17: Crochet 2 double crochets in each stitch except the last two.
Step 18: Cut yarn with a few extra inches and pull the yarn through the crochet loop.
Step 19: Repeat steps 16 and 17 to make the second eye.
Step 20: With white yarn, make a magic circle with 12 double crochets, connecting the ends with a slip stitch. Cut the yarn and pull the end through the crochet loop tight.
Step 21: Repeat step 20 for the second eye.
Step 22: With smaller black yarn, make a magic circle with 10 double crochets. Cut the yarn leaving a few extra inches and pull the end through the crochet loop tight.
Step 23: Using the few extra inches of the yarn ends, sew one black circle to the middle bottom of one white circle.
Step 24: Repeat with the other set of black and white circles for the second eye.
Step 25: Carefully sew the black and white circle to the front stitches of the green circle to make the first frog eye. making sure the white yarn doesn’t show in the back.
Step 26: Repeat to finish the second frog eye.
Step 27: Using the green ends of the eye, sew the flat end of the green circle to the top of the hat and pull the white and black strings through the bottom.
Step 28: Tie the strings for extra support on the inside of the hat and cut leaving 1 inch of string hiding on the inside.
Step 29: Repeat step 27 for the second eye.
Step 30: Enjoy your froggy hat!


