DIY Harry Styles-esque cardigan
First part of two-part series on DIY cardigan; columnist took inspiration from viral TikTok
Sarah Daniels | The Daily Evergreen
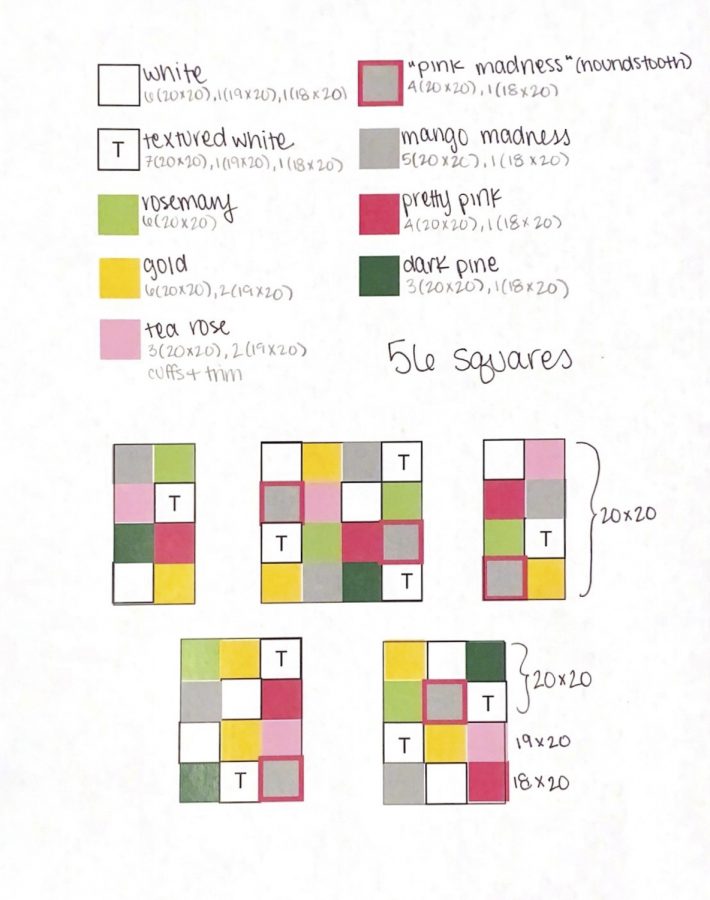
Follow this diagram of pattern and colors needed for the famous Harry Styles Cardigan.
February 18, 2021
I have crocheted and knitted so many things, ranging from scrunchies to blankets, potholders to dish scrubbers. So I was really excited to challenge myself to create my first item of clothing: Harry Styles’ cardigan (aka, the Tik Tok Cardigan).
Now, I wouldn’t actually wear Harry Styles’ cardigan – it’s baggy, unfitted, and the unfinished design is not for me. So, I drew massive inspiration from it to create my own pattern.
My cardigan will have a fitted and cropped waist (with the option for a longer and unfitted waist if you would like) and fitted wrists (with the option for unfitted) with a bishop sleeve with vastly different colors. The original designer, JW Anderson, released their knit pattern for the cardigan if you find yourself drawn more to the original pattern.
This pattern will be split into two articles: one to explain the body of the pattern and how to create the different squares, and a second for the assembly and trim.
Supplies
The yarn I used is cotton medium-weight yarn. Lily Sugar ‘n Cream can be found at Michaels, Joanns, and various online stores; Peaches & Cream is sold at Walmart.
o 310 yards of Lily Sugar ‘n Cream in Mango Madness
o 280 yards of Lily Sugar ‘n Cream in Pretty Pink
o 190 yards of Lily Sugar ‘n Cream in Tea Rose
o 170 yards of Peaches & Creme in Rosemary
o 120 yards of Lily Sugar ‘n Cream in Dark Pine
o 480 yards of Lily Sugar ‘n Cream in White
o 230 yards of Peaches & Creme in Gold
o Size H (5.00 mm) crochet hook
o Scissors
o Tapestry needle
o Patience
o Optional: Three labeled gallon-size Ziploc bags to sort your squares by size
Pattern Break-Down
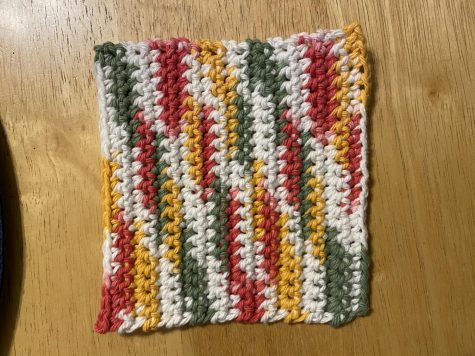
There are two types of stitches used in this pattern: single crochet and a houndstooth stitch in three different sizes: 20 inches by 20 inches, 19 inches by 20 inches, and 18 inches by 20 inches. The smaller squares are for the ends of the sleeves.
Check your gauge before you begin! Your square should be approximately 5 inches by 5 inches. If your square is too large or too small, consider going down or up a crochet hook size, respectively.
I am a size Large, so this pattern is designed for me. For a size Small, your squares should be 4 inches by 4 inches (16 inches by 16 inches, 15 inches by 16 inches, and 14 inches by 16 inches squares). For a Medium, your squares should be 4.5 inches by 4.5 inches (18 inches by 20 inches, 17 inches by 20 inches, and 16 inches by 20 inches squares). For an XL, your squares should be 5.5 inches by 5.5 inches (22 inches by 22 inches, 21 inches by 22 inches, and 20 inches by 22 inches squares). Continue adding or decreasing 2 stitches and rows at a time to reach your size. Follow the pattern the same otherwise.
I will explain the squares’ patterns before I break down how many you will need (spoiler alert: a lot). Do a back ridge loop first row to make the squares easier to sew together at the end
Abbreviations
o Ch = chain
o Sc = single crochet
o Dc = double crochet
o St = stitch
o ** = repeat what lies between asterisks
o Optional: Stitch/row counter
Simple Square 20 inch by 20 inch (19 inch by 20 inch, 18 inch by 20 inch)

Row 1: Ch 21 (20, 19), sc in 2nd ch from hook, sc in every st to end; ch 1 and turn
Row 2-19: Sc in every st to end, ch1 and turn
Row 20: Sc in every stitch, fasten off and trim
Pro tip: Fold your square diagonally to see if it is square if you don’t have a row counter. With my gauge, I had to do 21 rows to make my squares square.
NOTE: For the Houndstooth Squares, I only had to do 13 rows to make mine a square, which is why these patterns are written for 12 (since my gauge requires an extra row)
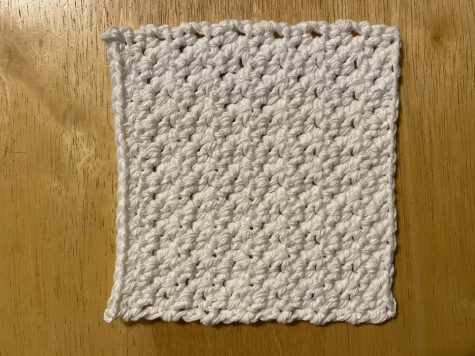
“Textured” Houndstooth Square, one color 20 inch by 20 inch (18 inch by 20 inch)

Row 1: Ch 21 (19), sc in 2nd st from hook dc in next ch, *sc in next ch, dc in next ch* to end; ch 1, turn
Row 2-11: Sc in first st, dc in next st, *sc in next st, dc in next st* to end; ch 1, turn
Row 12 (or final row): sc in first st, *dc in next st, sc in next st* to last st, sc in final st; fasten off and trim
Pro tip: I opted for a final sc instead of dc to keep the corners of the square more uniform and square
“Textured” Houndstooth Square, one color 19 inch by 20 inch
Pro tip: use a row counter or tally system to keep track of your rows with this square
Row 1: Ch 20, sc in 2nd st from hook, dc in next ch, *sc in next ch, dc in next ch* to end; ch 2, turn
Row 2: Dc in first st, *sc in next st, dc in next st* to end; ch 1, turn
Row 3: Sc in first st, dc in next st, *sc in next st, dc in next st* to end; ch 2, turn
Row 4-11: Repeat instructions for Row 2 and Row 3 until end
Row 12: Dc in first st, sc in next st, *dc in next st, sc in next st* to end; fasten off
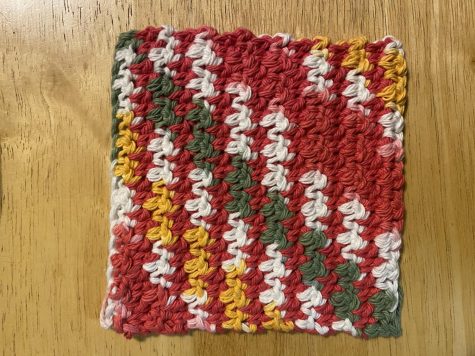
Houndstooth Square, two colors 20 inch by 20 inch (19 inch by 20 inch, 18 inch by 20 inch)

Follow the instructions for each size. You will carry the yarn through the entire square so you don’t have to weave in a bunch of ends.
Follow this website for how to change colors and carry the yarn.
Pro tip: don’t pull too hard on your carried yarn; only straighten at the end of your rows by holding the far end and gently pulling the carried yarn until it straightens then lightly stretch your work so the square is not misshapen.
The Squares
Based on this pattern and how the squares are spaced, you need the following amounts of each colored square and size:
o Simple White: 6 (20 inch by 20 inch), 1 (19 inch by 20 inch), 1 (18 inch by 20 inch)
o “Textured” Houndstooth White: 7 (20 inch by 20 inch), 1 (19 inch by 20 inch), 1 (18 inch by 20 inch)
o Simple Rosemary: 6 (20 inch by 20 inch)
o Simple Gold: 6 (20 inch by 20 inch), 2 (19 inch by 20 inch)
o Simple Tea Rose: 3 (20 inch by 20 inch), 2 (19 inch by 20 inch)
o Simple Mango Madness: 5 (20 inch by 20 inch), 1 (18 inch by 20 inch)
o Simple Pretty Pink: 4 (20 inch by 20 inch), 1 (18 inch by 20 inch)
o Houndstooth Two-Color Mango Madness and Pretty Pink: 4 (20 inch by 20 inch), 1 (18 inch by 20 inch)
o Simple Dark Pine: 3 (20 inch by 20 inch), 1 (18 inch by 20 inch)
NOTE: If you want a longer waist, you need to create an additional 8 squares in the colors of your choosing.
Here is a PDF of my visual pattern you can download, open with Word, and change the colors to print your own pattern or fill a physical copy out yourself! Good luck, enjoy, and keep your eyes open for part two!


