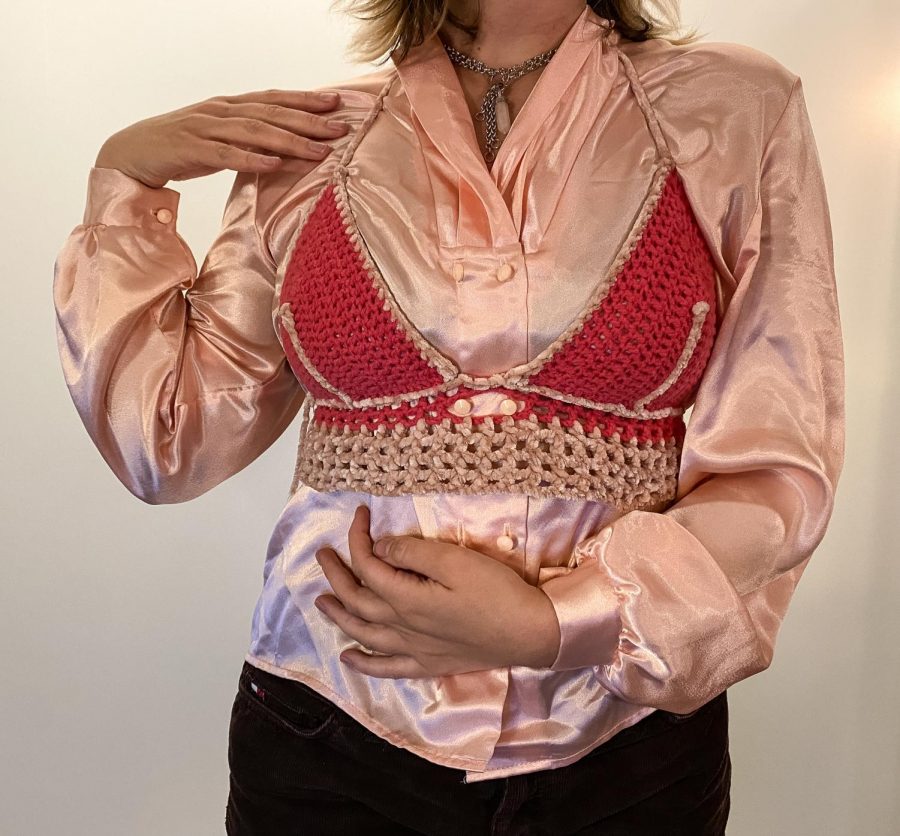
DIY crochet top for layering
Fall is time for layering; cute crochet project to show off style, finesse
A crochet top can add pizzazz to any layered outfit.
September 30, 2021
As the leaves change colors and the season shifts into fall, one iconic fashion trend is layering. This crochet top is a perfect go-to for layering and a fun pop of color this fall. It’s a fun edition that you can rock on any occasion.
The project took me around 4 hours from start to finish, but it can easily be done faster, especially if you don’t get easily distracted as I do. So let’s have fun and crochet.
Crochet level: Intermediate
Supplies:
- Two different bundles of yarn (I used two different pinks)
- 5.0 mm crochet hook
- Crochet marker (if you don’t have any, a bobby pin or safety pin will work as well)
- Scissors
- Crochet needle
STEP 1: Bralette Cups
- Chain 15 from the yarn (color one).
- Put a crochet marker on the 15th chain to mark its location.
- Chain two and single crochet into the second to last stitch (or the 14th chain).
- Single crochet the rest of the 14 stitches.
- ROW 1: Chain two and double crochet into the second to last stitch (or the 2nd stitch).
- Double crochet all stitches until the crochet marker.
- Take the crochet marker out and put three double crochets in the top on the 15th stitch (where the marker was) and place the marker on the second (or middle) stitch.
- Continue on the other side of the yarn with 14 double crochets to finish the first row.
- ROW 2: Chain two and repeat double crochet until marker.
- Place three double crochets in the location of the marker and continue double crocheting down the other side.
- ROW 3-5 Repeat for three more rows.
- This should leave you with five total rows, creating the cup of the bralette.
- Cut the yarn with about 4 inches to spare and sew in the end with your crochet needle.
- Repeat to create the second cup of the bra!
STEP 2: Torso and Waist
- ROW 1: Chain 10.
- After you chain 10, single crochet the yarn into the bottom corner of one bralette cup.
- Single crochet 24 total crochets along the bottom of the bralette cup.
- Chain five.
- Single crochet the yarn into the bottom corner of the other bralette cup.
- Single crochet 24 total crochets along the bottom of the bralette cup.
- Chain 10.
- ROW 2: Chain four and place one double crochet in the third stitch (aka skip two from the end of the chain 10).
- Chain two and place one double crochet after skipping two stitches.
- The pattern should go: double crochet, chain two, skip two stitches and repeat.
- ROW 3-6: Repeat until you have six rows (or more if you want more coverage).
- Cut yarn with about 4 inches left and sew in the end with your crochet needle.
STEP 3: Straps and Detail
- Slip stitch the yarn (color two) beginning at the corner of the bralette cup and the waist.
- After 12 stitches, you should be at the middle of the bralette cup. Carefully, slip stitch the yarn up the middle of the cup and back down again. This creates an outline and a pop or color.
- Continue slip stitches along the first row from the waist and repeat on the second bralette cup.
- Cut with scissors and use your crochet needle to sew in the end.
- Slip stitch color two along the outside of one of the bralette cups, beginning at the corner of the cup and the waist section and ending at the top point of the cup.
- From this point, chain 75 to create the neck strap.
- Repeat slip stitch with color two along the other side of the cup, joining the color together at the point/top of the bralette cup.
- Repeat for the other bralette cup.
STEP 4: Corset laced back
- Chain 150 (or more depending on comfort).
- Cut yarn and use crochet needle to sew in the ends.
- Take your bralette shirt and flip it over to the back. Use the yarn you just chained to thread into the top corner of a side of the shirt (row 1 of torso and waist). Use the other side to do the same.
- Take each end and cross the yarn to create an X, then thread the yarn through the bottom of the sides and tie together (row 6 of torso and waist).
STEP 5: Style!
- I love to wear clothes like this with long sleeves under the shirt or large fun jackets. Have fun and be creative with how you want to wear your shirt, after all, you made it. Why not show it off?


